Tuesday, October 12, 2010

Keyboard Basics

Introduction to the Keyboard


Today we are going to start using the keyboard.  We will be using the keyboard to record all of the melodic instruments that we use in Reason. Lets take a look........

What can you observe about keys on a keyboard? 
What patterns do you notice with the keys?

The notes on the keyboard are labeled by using the first 7 letters of the alphabet, ABCDEFG.
The black keys each have two names, 

they can either be sharp (#) or flat (b).

Above we can see one octave of the keyboard. An octave is made up of 7 white keys and 5 black keys; 12 notes total.  This pattern repeats over and over......
 
How many octaves are on this keyboard? Do you see the letters repeating? There are three sets of letters, which means there are three sets of the 12 notes and a total of three octaves.

Lets look at the keyboard that we will be using in class. The M-Audio Oxygen 8.
The Oxygen 8 is two octaves long. What is the note name of the first white key on the left?

Look for a button that says Octave.  This allows you to listen to your instruments at a lower octave or a higher octave.

2-4 Bar Drums Patterns in Redrum + Dr. REX with the Keyboard


Last week we learned a few new things. One: we learned how to create multiple lanes with your Redrum to have each sound on its own lane in the sequencer. Two: we learned how we can use the Dr. REX Loop Player to load in samples and add them to our drum patterns. Three: We gave you a sneak preview in class of how you can use the keyboard to create your own original melodies. For this lesson we will be learning a few things about the Redrum as well as a keyboard technique with the Dr. REX.


With the ReDrum we know that 16 Steps is equal to a Whole Note (aka 1 Bar). This would mean that 16 steps on the ReDrum equals 1/16th Notes. There are 16 1/16th Notes in a Whole Note. This means that we have been making 1 Bar patterns in Reason. Today we'll show you how you can use a feature on the Redrum to create a 2 bar or 4 bar drum pattern. In many cases this may enable you to only have to make 1 drum pattern for a beat without it sounding so monotonous. Let's start with the lesson.


1. Open Reason


2. Create a Mixer 14:2


3. Set your tempo between 80-100bpm.


4. Create a ReDrum
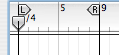
5. Set your L to 1 and your R to 5. Turn your "Loop On/Off" button to On.


6. For Sound 1 load in a Clap or Snare. Click it on boxes you normally put a clap or snare on. But WAIT!!! Do you notice the box with the number 16 in red? Change that to either 32 (32 steps = 2 bars) or 64 (64 steps = 4 bars). Next you will notice a switch on the right side of the Redrum that says EDIT STEPS. Move your EDIT STEPS up and continue clicking your Clap or Snare in on the appropriate boxes. You should now have either a 2 bar or 4 bar snare pattern. Copy this pattern  to track. Bring your EDIT STEPS back to 1-16 and go to Pattern 2.


7. For Pattern/Sound 2 load in a Bass Drum. Click it on the boxes you would normally put a bass drum on. Click the red 16 up to either 32 or 64. Use the EDIT STEPS function to continue creating your pattern and copy it to track. Bring your EDIT STEPS back to 1-16 and click to pattern 3.


8. For Pattern/Sound 3 load in a Hi-Hat. Click it on whatever boxes you would like. Click the red 16 up to either 32 or 64 and use the EDIT STEPS feature to complete your pattern. Copy it to track.


9. *optional*. Click over to Pattern 4 and load in a Percussion sound (Hi or Other) in Sound 4. Create a 2 or 4 bar pattern and copy it to track.

10. SAVE WHERE YOU'RE AT NOW! Save it as (Your Name) Redrum_Rex.

You should now have 3-4 patterns copied to the track. You should have either a 2 bar or 4 bar pattern. Because your L is 1 and your is 5 your total loop will be 4 bars. Do NOT begin arranging the pattern in song format as we are just currently working with creating our main loop.

Now this brings us to the Dr. REX Loop Player. When we first started using it last week, we learned that it can be used to play various types of loops. These loops vary from Drums, Percussion and other Instrument loops. The loops that we use are premade and come bundled in with Reason when you purchase it, but it is also possible to make your own Dr .REX loops using another software. It is also possible to take a Dr. REX loop and not have to loop it. This method is often referred to as "Cutting" or "Chopping" samples. Chopping a sample usually refers to cutting a sample up into smaller pieces and rearranging them. This style of sampling was made extremely popular by music producers such as DJ Premier, Pete Rock. These days you'll find this style of sampling used all over: in Hip-Hop, R&B, Pop, Disco and even some Rock. Here are some examples of sample chopping.


So with these examples you see just how possible it is to get creative with a sample. With that said, let's see if we can get creative with some samples!


11. Load in a Dr.REX Loop Player.

12. Click on the folder on the left side of it. Go to Reason Factory Soundbank: Music Loops: Variable Tempo and choose a Downtempo Loop.Do NOT put it "To Track".

13. Set your keyboard to around 0 or -1. When you touch the keys you should hear small slices of loop you chose. Practice creating a pattern with the melody that matches your drums. When you are ready, click the Record button and record your melody. After recording your melody, click the Quantize button to fix any slight errors you may have made with your rhythm.

14. Create another Dr. REX Loop Player. Load in a Dr. REX Percussion Loop and repeat Step 13.

15. When you are finished with this step save your work. Make sure you put it in your folder on the desktop AND on your folder inside the Yellow DP Audio A Folder.

Thursday, October 7, 2010

Using Multiple Pattern Lanes + The Dr. REX Loop Player


In the last class we practiced recreating a drum pattern by ear. To do this we first listened to a song to analyze a drum pattern. We first listened to the types of sounds that the pattern had, then we figured out how to place the sounds. Afterwards we copied the pattern to track in Reason. Today we're going to introduce a new method of drum programming. This method is perfect for arrangements. Why? Because it involves us using only 1 sound per pattern and copying that pattern to track. When you make the next pattern with a different sound and copy it to track a new lane appears on the Redrum track dedicated to just that sound. With this technique, you can now have your Bass Drum, Hi Hat and Snare Drum all on their own track, giving you much flexibility for arrangement when it comes to making a song. Let's get started practicing.


1. Open Reason


2. Create a Mixer 14:2


3. Set your tempo between 80-110


4. Create a ReDrum Drum Computer


5. For Sound 1 Pick a Snare Drum. Place it on the appropriate boxes. Now copy this pattern to track. Now select Pattern 2.


6. For Sound 2 Pick a Bass Drum. Place it on the 1 and a few other boxes of your choice. Now copy this pattern to track. Select Pattern 3.


7. For Sound 3 pick a Hi Hat. Place it on any boxes you want. Copy this pattern to track.


8. Now click the orange pattern button so that it turns white.


9. Press your "loop on/off" button so that it turns green and press play. 

What do you notice about these different Redrum lanes? Each Lane can be given a custom name. If you double click on the name on the left (Lane 1, 2, 3, etc) a dialog box will pop up where you can change the lane name. This way you can name your bass drum lane, snare drum lane, hi hat lane, etc. You can also change the clip color by either right clicking or holding control and clicking a box and going to the "clip color" menu.


 AND NOW...


Introducing The Dr. Rex Loop Player!
 First things first - what is a Loop? 
A Loop is a Sample of music that is repeated.  In Reason the Dr. Rex Loop Player is loaded with short loops of music that we can add to our songs.  Specifically the Dr. Rex has three categories of loops, which are Percussion, Drum and Instrument loops.
Loops can be a fun and easy addition to your song.  It is important to remember though, that these clips of music have been used by hundreds of people in thousands of songs. So, in the future when you are more experienced, I advise that you use them sparingly. 


The first step to using the Dr. Rex loop Player is going to the Create menu creating a Dr. Rex. This is the same way that you would create a Redrum or any of the other Reason instruments.  Once you have a Dr. Rex in your Rack you can click on the folder Icon and load up your first loop.
Next you will need to go to Reason Factory Sound Bank. For the Dr. Rex Loop Player there are three folders to choose from:
Dr. Rex Drum Loops, Dr. Rex Instrument Loops Or Dr. Rex Percussion Loops.
Each of these folders contains categories of loops that you can listen to and choose from. 
One thing to note as you go through these loops you will notice that the loops have a number often followed by "bpm".
What is bpm?

...Beats Per Minute which refers to the Tempo.
These loops were created or recorded at a certain tempo. You do not need to keep your song at this tempo, but you should know what the original tempo was.

OK, Once you have selected a loop it will appear in your Dr. Rex Loop player and you will be able to hear it at the tempo of your song by clicking the "Preview" button.
If you like how it sounds, you can now put it down in your Sequencer.  Find your left and right markers...
Put your left and right markers where you want your loop to be placed in your song.

Finally, click the "To Track" button and your loop will appear between the left and right markers in your song!

Assignment: 
You should have a new drum beat from today's lesson. What you are going to do now is add an Instrument and Percussion Loop to your beat.

Things to note:
1. For each of the loops you will need to create a new Dr. Rex Loop Player
2. (Optional) Speed up or Slow down your beat by 5bpm.
3. Save as (your name)_DrRex1 and put in your folder inside the DP Audio A folder.


Tuesday, October 5, 2010

Recreating Drum Patterns + Copying Patterns to Track

Today we're going to experiment with recreating drum patterns. We will listen to a song on the top 10 charts and use our knowledge of the Redrum to make pattern as close to it as we can. However, we're not going to post the steps up on the blog. Instead, we will post the song here and you will use your ears to make a pattern.


After you have recreated the pattern, you will learn how to copy the pattern to the "track" of Reason. We will provide you with the steps you need to copy a pattern to the track.


The song is "Just The Way You Are" by Bruno Mars.

http://www.youtube.com/watch?v=LjhCEhWiKXk


1. Open Reason


2. Create a Mixer 14:2


3. Set your Tempo to 109bpm
4. Create a Redrum


5. Listen to the song posted on the blog. What instruments do you hear in the beat? What sounds are used in the drum pattern? Recreate this pattern using your ears and the techniques we learned with the Redrum last week. Let Corina or Ian know when you've finished the pattern and they will check your work. When you've finished the pattern proceed through the rest of the assignment.


6. Now that your Redrum pattern is created, hold down the Control key and click your Redrum on any green portion. Choose "Copy Pattern to Track". You should notice a box appear on the "track" portion of Reason.


7. Click the orange "pattern" button on the Redrum so that it turns white.
8. Click the "Loop On/Off" button on the track so that it turns green.
9. Press play. You're now playing your pattern from the track, instead of the instrument. As we progress we'll learn more about the track and how it is necessary for arranging a song.
 10. Save your Work! Title it (your name)_brunomars.

Thursday, September 30, 2010

Redrum: Making Your Own Drum Kit

 
Today we are going to continue learning how to use the Redrum Drum Machine.  On Tuesday you made your first drum beats by using pre-made drum kits in the Redrum Drum Kits folder.  Today we are going to learn how to select your own drum sounds to make your own custom made drum kit.

Lets review the steps that come before creating your own drum kit.  First, create a new Reason document.  Then, you must always start by creating the Mixer 14:2.  Once you have done this you can create your instruments.  

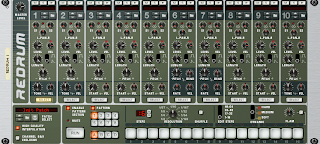
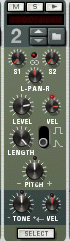
Now you can go to the create menu and create a Redrum Drum Machine.  On the Redrum, you can load up to 10 different drum sounds.  Notice the 10 numbered tracks that look like the image to the right->.  On each track you should find a Folder icon.  If you click on the folder icon a window will pop up, just like when we loaded a full drum kit.  To find single drum sound select Reason Factory Sound Bank, then look for the Redrum Drum Kits folder.  Inside this folder you will find Xclusive Drums-Sorted at the very bottom of the list.  This folder contains several categories of drum sounds.  

Assignment
For today's assignment we will create our own drum kits and use the individual sounds that we picked to create a pattern. We will then save our created drum kits as well as our beats. Here are the steps to follow.

1. Open Reason.

2. Create a Mixer 14:2.

3. Set your tempo anywhere between 80-100bpm.

4. Create a Redrum Drum Computer.

5. Click the folder on Sound 1. Go to Reason Factory Sound Bank: Redrum Drum Kits. You should see the Xclusive drums folder. Click it and drag it in the same menu that you see the Reason Factory Sound Bank.

This will make it easier to locate this folder from now on. Now, click on either the folder 02_Snaredrums or 04_Claps. Pick a Snare or Clap of your choice and click it on boxes 5 & 13.

6. Click the folder on Sound 2. Go to Xclusive Drums: 01_Bassdrums. Pick a Bass drum of your choice. Click it on box 1 and 2-4 boxes of your choice.

7. Click the folder on Sound 3. Go to Xclusive Drums: 05_HiHats. Pick the Hi Hat of your choice and put it on any boxes that you want.

8. Click the folder on Sound 4. Go to Xclusive Drums: Choose a sound from either 07_Percussion-Hi or 08_Percussion-Other and click it on any boxes that you want.

You now have a 4 sound beginners drum kit. To save this drum kit, click on the disk icon on the bottom left of the Redrum. Save the kit in your folder as (your name) drum kit 1. Also go to File: Save As and save the Reason document in your folder. You can name it whatever you want, but do NOT leave it as "untitled" as this can become confusing later down the line.

When you are finished, start a new Reason document. Use the methods learned in this lesson & assignment to create another drum kit using at least 3 sounds.

Tuesday, September 28, 2010

Introduction To Reason

Welcome to Digital Pathways! In this class we will be learning much about audio production. There is much to learn and so we will be moving at a fast pace. However, with this blog we will be able to keep track of all of our projects and assignments. With that said, the main program we will be using is called Reason. It is one of the leading music production programs available on the market. What's even better is that it is a user friendly program that you have the chance to learn. It is very important that we do not move to fast as it could get confusing, so lets take time to learn the basics about Reason, it's controls, and music production.

Let's start with the very basics of making a drum beat. Drums are very important. In many cases they can be seen as the most important part of music. The reason is because a drummer's job in music is to keep the time of a song. He helps the band to know how fast or slow to play. It is for this very reason that we will learn how to drums first before we move to otherwise challenging aspects of music production. Here we go:


  1. Open Reason
  2. If you don't see a mixer: go to the CREATE menu and select a Mixer 14:2
  3. Set Tempo to 98 bpm. You should see the tempo on the bottom of reason near the play button.
  4. CREATE: Redrum Drum Machine
  5. Click on the Folder Icon in the bottom left corner of the Redrum.
  6. From there click on the Reason Factory Sound Bank:Redrum Drum Kits:Hip Hop Kits: Hip Hop Kit 07
  7. Push SELECT on Sound 3. Click on Boxes 5 and 13 (This is the golden rule of drum programming with the ReDrum)
  8. Push SELECT on Sound 5. Click on Boxes 1 and 11
  9. Push SELECT on Sound 1. Click on all the boxes
  10. Congratulations! You have made your first beat!
  11. Now Click on Pattern 2 and create your own beat with a Clap or Snare, Bass Drum, and Hi Hat.
  12. Remember start with a Clap (clp) or Snare (sn) on 5 and 13
  13. And put your Bass Drum on 1 and a few other boxes (but not boxes 5 or 13).
  14. Put your Hi Hat (HH) anywhere.
  15. Now let's save the beat.
  16. Go to the File menu and click SAVE.
  17. When the window pops up, go to your folder you created that should have your name on it.
  18. This is where you're going to save your beats.
  19. Name the beat (your name's) first beat.
  20. Click Save.
  21. Now that you have made this drum beat, click over to Pattern 3 and work on a new pattern. Lets keep working on new patterns.

A Few Things to Take Care of

There are a few things we need to do to begin our Digital Pathways program.  The first thing we need to do is fill out a Pre-Course survey.  You will be able to do this by clicking on the link below.

Once you have finished the survey please notify Corina or Ian and we will help you with creating a BAVC Gmail account.   We will be using this throughout the program for email communication for class and for internship opportunities and coordination.  

This week we will also be creating BAVC Profiles on the BAVC website.  This will be a great place to showcase your work as well as blog.