Tuesday, November 9, 2010

MIXING!


Today we are going to continue working on your first full song but we will add an extremely important element called MIXING.   Mixing is when we take all of our tracks and arrange them in the two channel, left and right Stereo mix.

In the early days of recording, they recorded in mono(one speaker), they also had only 4 microphone tracks or less, so mixing did not really exist then.  As technology advanced so has the idea of mixing. In the 1960's we began to hear music in stereo and more and more tracks were added to the songs. Now we are able to record as many tracks as we want, and for movies they are even able to mix in surround sound. 
For music though, we usually just mix in stereo, with a left and right side.

According to "The Mixing Engineer's Handbook," for every type of music there are six important elements to a MIX.
1. Balance- the volume level relationship between the musical instruments

2. Frequency Range- having all frequencies properly represented

3. Panorama-(pan-L and R) Placing your instruments in the "sound field"

4. Dimension- Adding ambiance to your instruments(FX)

5. Dynamics- Controlling the volume of each track

6. Interest- making the mix special
 
Please listen to the following examples in your head phones.
Here is an example of music from the 1950's that is recorded in Mono:

Now compare to a song from today that has a complex mix, arrangement and FXs:

What did you notice about the mix of Beyonce's song Radio?


When using Reason where do you think we could start to begin mixing your song???
The Mixer!
The first things we are going to learn about the mixer is how to control the volume of each instrument and how to place them in the "sound field"

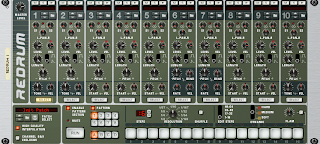
For each instrument we create in reason there is a corresponding track in the mixer. The 14:2 Mixer has 14 tracks and we can mix them in stereo(2). We are going to focus on the bottom of the track that looks like this:

This shows that we are working with the Redrum. The white knob controls the volume for each instrument. 
When I talk about the Sound Field I am referring to where the instrument is in the left and right stereo speakers. This is known as Panning. There is a knob on each track with an L and R.  By turning this knob you can control what side of the head phones you will hear that instrument. 

Adding FX: 
There two effects that I am going to show you today, the first is called REVERB, short for reverberation. This is an echoing sound that persist after the original sound is played.
In reason there a few different reverb effects processor. I am going to have you start with one called the RV-7 Digital Reverb.

To put reverb on your instruments you must first click on the instrument that you want to work with. Once it is highlighted, go to the tool window and under the devices window you should see several effects. Double click on the effect called RV-7 Digital Reverb.

Ok, so what do we see...
First there is a switch to have the reverb on, off or bypass. This is a great way to compare and contrast what the instrument sounds like with the reverb on and with it off/bypassed. 
-Where it says "hall" is where you can select different reverb settings that are different sized rooms.  
-Size refers to the size of the imaginary room that your sound is echoing in
-Decay is how long a sound takes to fade out
-Damp is a filter that effects the tone of the instrument
-Wet/Dry is where you can control how much of this reverb you want on your instrument.

Another effect that you can use today is called DELAY. Delay is an echo effect that plays the initial sound back after a period of time. In reason the delay is matched with the tempo so it sounds on beat with your song. To start using delay you can use the DDL-1 Digital Delay line.

When dealing with the volume, panning and effects of each instrument you need to think about the elements of your arrangement. This will help you decide where to place your instrument in the mix to create the right balance.


Arrangement Elements:
Foundation: The rhythm section, usually Bass and Drums
Pad: Long sustaining note or chord often synthesizer, organ, strings or guitar power chords.
Rhythm: Any instrument that plays counter to the foundation element. It can be double-time shaker, tambourine, rhythm guitar strumming on back beat. This adds motion to the song
Lead: a lead vocal, lead instrument or solo
Fills:  Fills generally occur in the spaces between lead lines or they can be a signature line.


Thursday, November 4, 2010

Making an Arranged Beat

We are now at a point where we are ready to start arranging beats. This is important for numerous reasons. The beats we have been making lately have just been loops, meaning all we hear is the same thing repeat over and over again. We haven't been able to decide when we want to hear a certain sound. Maybe you want to drop a certain melody out for a verse in the song, or you only want one instrument to play during the intro. All of these can be achieved by arranging a beat. Another word for the "arrangement" is the "sequence", as it is the order that events happen in the beat.

INTRO 1-9
CHORUS 9-17
VERSE 17-33
CHORUS 33-41
VERSE 41-57
CHORUS 57-65
VERSE 65-81
CHORUS 81-89
OUTRO 89-97


There are many different styles of Intros. Here are a few different styles that I came up with that you can think about when creating your intro.


1. "The Build Up"
A common why to start a song is to introduce one intrument at a time and build up the intensity of the song.
Example of building up intensity one instrument at time:


2. "The Drum drop" OR Starting with only the Drums
This is when the song begins with other instruments(piano, guitar, etc.) before the drums kick in.  It is also very common to do the opposite -start with only the drums and then have all the other instruments drop in together.
Ex 1- drums drop in 


Ex 2- Drums start then instruments drop in


3. "Attention getter" This is an exciting way to demand your audience's attention.  This can be done in a variety of ways, here is one way to do it:


4. "Sound Fx, Synthesizer and Pads" A great way to intrigue your audience is to start with unique and interesting sounds.  Pads are a type of Synthesizer patch that can add a lot of character to your song.  When you play a pad on your keyboard the sound transforms as you hold the note. This will add interesting texture and create a unique atmosphere in your song.  On the Synthesizer instruments in Reason you can find a folder called Pads and one called FX.  Please explore these sounds and feel free to add them to your song!

 
  1. Open Reason.
  2. Open your beat you made on Tuesday.
  3. Make sure you have all your parts Copied To Track.
  4. Highlight all your parts.
  5. Go to the Edit Window, Select Copy.
  6. Go to the Edit Window, Select Paste.
  7. Move the Right Loop Point to 33.
  8. Paste your parts until you get to the Right Loop Point.
  9. Save your beat.
  10. Now focus on the INTRO, 1-9. Your intro is the first impression people get when they hear your song. It's like when you meet someone for the very first time, you can't tell the person your life story in a sentence, but you can give them an idea about you and your personality in the way that you greet them.

    The best intros make the listener want to hear more, the worst make the listener skip to the next song. The intro usually drops one of the parts from the beat. If you drop the drums or the bass line, it can cause some tension, and bring the listener in.
  11. Focus on the Intro from 1-9.
  12. Delete a part such as the drums or bass line to "Introduce" your beat.
  13. Save your beat.
  14. Now we can work on the Verse.
  15. Remember, from yesterday, the verse is the part of the song that tells the story and is different every time.
  16. We want to create space for a vocalist in our verse.
  17. From 17-33, delete the melody from your song.
  18. Now, we have 3 sections. The Intro from 1-9, the Chorus from 9-17, and the Verse from 17-33.
  19. Highlight all the parts between 9-33.
  20. In the Edit window, select Copy.
  21. In the Edit window, select Paste two times.
  22. Now Highlight all the parts between 9-17.
  23. In the Edit window, select Copy.
  24. Move your cursor to 81.
  25. In the Edit window, select Paste.
  26. From 81-89 Create an Outro by deleting all the parts except for your melody.
  27. Save your beat! Save it as (Your name)_fullbeat
Congratulations, you've made your first full beat! Now let's take what you learned in this lesson to turn the rest of the beats that you made on Tuesday into full beats. You can also take this time to start on a new beat that you may even want to try to turn into a full beat today.


Tuesday, November 2, 2010

Song Stucture

Song Structure describes how we put our songs together.  In popular music today, the primary elements of song structure are called the VERSE and CHORUS.  

The VERSE of the song usually has a melody that repeats but the lyrics change for each verse.  The verses usually take up the majority of the song and tell the "story".  It is similar to a stanza in poetry. 

The CHORUS or refrain has a repeating melody and also repeating lyrics.  It usually catchy, exciting, has more instruments, and has higher dynamics.

Typically in popular music today a Verse is 16 bars long and the Chorus is often 8-16 Bars long.  

I would also like to introduce the part of a song called the INTRO which is short for Introduction! Where in a song would you find the intro? ....the beginning of the song, of course!

We are going to do a listening exercise to practice identifying the Intro, Verses and Chorus in a few songs. 


.....Now that we have a better understanding of Verse and Chorus we will start structuring your songs this way in Reason.   

Here is an image from reason with a 16 bar verse (1-17) followed by an 8 bar chorus(17-24). 

The Re-Groove Mixer


You may have noticed a button on Reason that says "Re-Groove Mixer" on the bottom right hand side of the screen. We have used this button before but that was only to control the "Global Shuffle" of our ReDrum pattern. Well there's also a way that we can control the shuffle of our individual drum sounds in Reason WITHOUT having to slide each individual sound manually in the grid mode. Using the Re-Groove mixer you will see just how easy it is to make adjustments to your ReDrum pattern. Lets get started.

1. Open Reason

2. Create a Mixer 14:2 (if you don't already have it on your screen).

3. Set your tempo between 80-100bpm for this exercise.

4. Create a Redrum. This exercise is going to be a 64 step beat.

5. Set your "R" on the Track of reason to R5 for a 64 step beat. Turn the "Loop On/Off" to On.

6. For pattern 1 your 1st sound should be a Snare OR Clap. Copy your pattern to the track when you finish.

7. Switch to pattern 2. For pattern 2 your 2nd sound should be a Bass Drum. Pick a bass drum, click your bass drum in on the boxes that sound right to you and copy the pattern to the track.

8. Switch to pattern 3. For pattern 3 your 3rd sound should be a hi hat. Pick a hi hat, click the hi hat on the boxes that sound right to you and copy the pattern to track.

9. Click the orange "pattern" button so that it turns white.

10. Now lets take a look at our Reason track. We should see one ReDrum down there with 3 different lanes for each sound. On each lane you will notice a circle with a red dot, a rectangle and a square with an M in it. Our focus right now is on that Rectangle.


11. On the first lane click the rectangle. Go through the menu and pick A1. On the 2nd lane go through the menu and click A2. On the 3rd lane go through the menu and click A3.

12. Now click on the Re-Groove mixer. Do you notice where it says A1, A2, A3, etc.? Our focus right now is just on the first 3.


13. Press play on your beat (with loop on) and click on the folder of A1. Go to the Reason Factory Sound Bank. Click on Re-Groove Patches. For this exercise lets go to the folder that says MPC-60. Pick any shuffle between 65-75%.

Do you notice how the difference in your drum sound?

14. Now adjust your slide and shuffle for this sound by just a little bit. If you most the slide to the left, the sound will trigger earlier. If you move the slide to the right, the sound will trigger later.

15. Now go to A2 and add in a Re-Groove patch. Load in a patch of your choice and adjust the slide/shuffle.

16. Now go to A3 and repeat the steps above.

Good work.

Save this as (Your Name) ReGroove.

Now start a new beat using this method for your ReDrum pattern. This can ALSO be applied to your original melodies that you have recorded to the track. Once you have your 4 bar drum pattern copied to the track and using the ReGroove mixer, start creating new instruments and try to add at least 2 more instruments such as a bassline, piano or synthesizer.

Thursday, October 28, 2010

The Synthesizer


Today we're going explore using an instrument known as a Synthesizer. What is a Synthesizer?

"A synthesizer, or "synth", is an electronic musical instrument that uses filters and tone generators to create waveforms which are then processed to generate sound. Modern synthesizers can closely reproduce the sound of some instruments, but many keyboard players use them for their characteristic sound. They are sometimes referred to as "sound" or "music" synthesizers." - Wikipedia. (Click HERE to read the full article.)


Different types of synthesizers include the Theremin and the Moog. The Theremin (Invented by Leon Theremin) is considered to be the original electrical musical instrument. The Moog (Invented by Robert Moog) is considered to be the most groundbreaking electric instrument.

Chances are that you've heard synthesizer sounds used in all popular music from soul to electro. Here are a couple of examples.

The Dramatics - Do What You Want Be What You Are


Daft Punk - Around the World


In Reason there are a few synthesizers that can be used. There is the Subtractor Analog Synthesizer, the Malstrom Graintable Synthesizer, the Thor Polysonic Synthesizer, and the Combinator (which isn't exactly a synthesizer, but combines instruments that can include synthesizers).

Here are some images and descriptions of each instrument (Provided by Propellerhead).

Subtractor Analog Synthesizer - Similar in layout of the analog flagships of the early 80s, the Subtractor is an easy way to create anything from warm pads to rumbling bass. It's two oscillators can produce well known basic waveforms like square, sawtooth, triangle and sine plus an additional waveforms based on samples.

The layout is simple to grasp with all the controls conveniently visible on the panel, but there is still no lack of possibilities. With dual filters, three envelope generators and two LFOs, the Subtractor can produce just about any sound you want it to.

All the Subtractor's parameters are fully automatable, meaning that it's easy to record and edit any parameter changes on the Subtractor.

The Malstrom Graintable Synthesizer - Malström creates its otherworldly sounds using Graintable technology. Never heard of it? Neither had we, we had to invent it. This technology is a cross between granular synthesis and good old wavetable synthesis. And the result? You'll just have to hear it to believe it.

The Malström Graintable synthesizer features all imaginable filtering and modulation options, and a couple of unimaginable ones too; Try some real-time waveform stretching, some spectral modulation, or some awesome wavetable sweeping.

Malström comes with a wide range of meaty and exotic Graintables, letting you create anything from lush pads to scary squeals, from the pretty to the gritty. And that's just the sounds coming from Malström itself; try using this monster's audio inputs to filter other Reason devices, and let some of Malström's magic rub off on your drums or sampled vocals. With a device like this, no one can accuse your sound of being ordinary.

Thor Polysonic Synthesizer - Thor sounds like no synthesizer you've ever heard before - and every single one of them. Where other synths use one specific form of synthesis and one single filter, the Thor polysonic synthesizer features six different oscillator types and four unique filters. What does this give you? Simply the most powerful synth ever created; an unstoppable monster of a sound generator that utilizes synthesizer technology from the last 40 years.

Combinator - The Combinator is a device which can be used to take numerous sounds from instruments and combine them to create one unique sound.

Don't feel scared to use these instruments, they ALL have presets and they ALL are customizable.


Let's see how we can incorporate a synthesizer instrument into our music production.

1. Open Reason

2. Create a Mixer 14:2

3. Set your tempo between 70-100bpm.

4. Set your L to 1 and your R to 5.
Turn your "Loop On/Off" to On.

5. Create a Redrum Drum Computer. Create a 32 or 64 step drum pattern that uses at least 4 drum sounds (snare, bass drum, hi hat, percussion). Each sound should be on its own pattern and you will copy each pattern to the track.

6. Create a Dr. REX Loop Player. Pick a Dr. REX Percussion Loop. Do NOT put it "To Track"! Instead, use the keyboard to try and create an original percussion pattern with the loop. If you have any rhythm errors, remember that you can quantize the recorded pattern.

7. Create an NN19 or NNXT instrument. Load in a piano or guitar patch of your choice and try to create a melody that uses 3 chords from the C Major scale. If you have any rhythm errors, remember that you can quantize the recorded pattern.


8. Create a synthesizer instrument. If you create a Subtractor or Malstrom, then load in a monosynth of your choice.


If you create a Thor, then load in a Lead Synth of your choice.


With this instrument try to create a melody that uses the C Major scale.


Tuesday, October 26, 2010

What we have learned so far...

I would like review with you some of the important elements in composing a song.  Specifically the Tempo, Instruments, Key Signature, Arrangement, and Lyrics.


Tempo
  • How Fast or Slow your song is
  • BPM: Beats Per Minute
  • Beats and Bars (Time Signature)
Instruments
  • Percussion: 
    • Drums: Bass, Snare, HiHat
  • Melodic: 
    • Bass line
    • Chords
    • Melody and Harmony
Key Signature
  • The Key tells what notes are used in the song
  • Major vs Minor Keys
  • Scales are all the notes in the Key
  • Chord Progressions
Song Structure and Arrangement (coming soon)

Lyrics (coming soon)


You are learning to be a one lady band!  Here is a great example of someone being a one man band using a loop pedal.  Just like the loops we make in reason, he is creating 4 bar loops to build a full song.


Here are examples of important elements in song composition.

DRUM GROOVE:


BASS LINE:


Chords:


CHORD PROGRESSION:

Recreating Patterns + Layering Drums

Drum layering is a very important skill in todays modern music. Why? Music producers have been layering drums and finding new ways to process them in order to create their own unique signature sound. Examples include Dr. Dre, DJ Premier, Pete Rock, Timbaland and the Neptunes. These are 5 different producers with unique drums that they created. For an example, let's listen to an instrumental from Pete Rock.


Notice anything in particular about the drums on this song? They are the combination of a drum break and individual drum sounds playing on top of them to re-create the pattern. In today's exercise we will work on this method of drum programming. It will also help you get a better idea of how to recreate drum patterns that you may hear in different genres of music. Let's get started.

1. Open Reason


2. Create a Mixer 14:2


3. Set your tempo between 75-100.


4. Create a Dr. REX Loop Player. Load in a Dr. REX Drum loop of your choice (I personally recommend Drum N Bass, RnB HipHop and Abstract HipHop).


5. Set your L to 1 and your R to 5 & turn you. Put your Dr. REX Loop "To Track".

6. Turn your "Loop On/Off" to On.


7. Create a ReDrum Drum Computer.


8. Try to recreate the pattern of your Dr. Rex loop using Redrum sounds. Each individual Redrum sound should have its own pattern. Copy each pattern to the track. Experiment using more than 1 snare or bass drum (example: 2 different bass drums that have the same pattern).

9. When you are finished let Corina or Ian know.