Welcome back! Hope you enjoyed your holiday. We're going to get started on a new assignment, which is something different than the previous assignments we've done before. Today we're going to work on producing music to a speech. The audio selected is from Maya Angelou's poem "And Still I Rise".
"Maya Angelou is one of the most renowned and influential voices of our time. Hailed as a global renaissance woman, Dr. Angelou is a celebrated poet, memoirist, novelist, educator, dramatist, producer, actress, historian, filmmaker, and civil rights activist."
Let's have a listen to the audio of And Still I Rise.
Are there any parts in the poem that you feel deliver an especially strong message? What type of music do you think would be played under a poem like this? Well, let's work on creating our own music based around it!
1. Open Reason
2. Create an MClass Mastering Suite Combi
3. Create a Mixer 14:2
4. Create a NN19 Digital Sampler
5. Do NOT Load in a Patch!!! Instead, click the folder above the keyboard on the NN19. Go to the Yellow Audio A folder and open the WAV file that says And Still I Rise. Now click the button on the NN19 that says SOLO SAMPLE.
6. Open up the "piano roll" on the NN19 track on the sequencer of Reason. The sample is located at C3. Draw a line leading from the beginning of the song to about 3 minutes.
7. Set your tempo to a bpm of your choice. You may want to make adjustments to the tempo to better fit the speech.
8. Now with these steps completed, create an arranged beat that plays from the beginning of the speech to the end. Try to cater this arrangement to the speech and not necessarily to a song. This means that choruses and verses don't have to follow a specific guideline, but you'll want to make sure you have different parts to your beat.
Today we're going to look at the MClass Mastering Suite Combi. This mastering suite helps to control the overall sound quality of the entire beat. How does it do this? Through sound processing such as EQ, Compression and Limiting. We have mentioned these things before in our early talks of mixing. So where should the MClass Mastering Suite be located in your Reason session? At the Top!
There are times when you'll start a new Reason session and you'll automatically see the MMSC at the top. If this doesn't already work for you, let's look at how we create one.
1. Click the Audio Driver on your Reason screen.
2. Go to the Create Menu and click MClass Mastering Suite Combi.
3. It should now appear as the top instrument in your Reason session. You can now create your beat as you normally would.
We will further explore how to use this equipment in a future lesson.
You should all have made at least one full song by today. Its time to learn how convert your Reason file into an audio file that you can put on a CD or email to a friend!
Once your Reason song is completed you need to find the END MARKER. If you scroll as far as you can in the sequencer you should find the end marker. You will need to move the end marker to the end of your song.
You should leave 1-2 bars between your last notes and the end marker. This lets you hear any reverb or ambient sounds that may follow your last notes and gives your song a more natural finish.
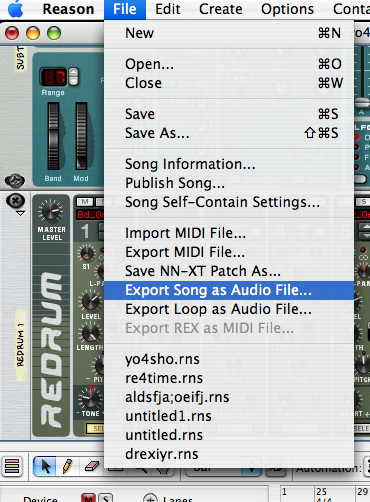
Once your end marker is in place, go to the File menu and select Export Song as Audio File...
A window should pop up where you can choose how to save the song. Make sure you save it as a WAVE file. Once you hit Save an Audio Export Settings window will pop up. Keep the settings that are up and click Export.
You should now have a wave file of your song.
Double click your new file and it should open in iTunes.
In order to email your song you will need to convert the song from a WAVE form to an MP3. In I tunes you will need to go to Preferences in the iTunes menu. Click Import Settings...
In Import Settings make sure that MP3 Encoder is selected.
Now that you have the Settings ready you can easily convert your wave files to MP3s. Make sure the song that you want to convert is hightlighted then go to the Advanced menu and click Create MP3 Version. The new MP3 version should show up in just a couple seconds.
The Mp3 version is a smaller simpler file that you can easily attach to an email and put on a CD or Jump Drive.
Let's explore using the RPG-8 Monophonic Arpeggiator. But first, let's have a quick discussion. First: What is an Arpeggiator?
An arpeggiator is a feature available on some synthesisers that automatically steps through a sequence of notes based on an input chord, thus creating an arpeggio. The notes can often be transmitted to a MIDI sequencer for recording and further editing. An arpeggiator may have controls to manipulate the order and speed in which the notes play; upwards, downwards, or in a random order. More advanced arpeggiators allow the user to step through a complex sequence of notes or play several arpeggios at once.
To simplify the above paragraph: When you play a chord while using an arpeggiator, you will end up playing all of the notes of the chord in a sequence. This sequence has some customizable functions. You can control whether or not the arpeggiator goes up the scale, down the scale, play a random pattern, etc.
There's more to it: an arpeggiator cannot be used by itself. Why not? Because it is acts as a controller and not a stand-alone synthesizer. With that said, you must first create a synthesizer and then create an arpeggiator which will connect to the synthesizer. Here is how you use an arpeggiator inside Reason.
1. Create a Synthesizer in Reason (Thor/Subtractor/Malstrom).
Thor
Subtractor
Malstrom
2. Load in a patch with that synthesizer.
3. Create an RPG-8 Monophonic Arpeggiator.
4. Now, attempt to play a chord with the keyboard. Notice what happens?
You're not necessarily limited to just using a synthesizer with the RPG-8, but today it is what we are using for the exercise.
Now that we've worked on creating arranged beats AND we've worked on some mixing techniques, let's talk about automation. What is automation?
Automation is the use of control systems and information technologies to reduce the need for human work.
This applies to the industrial world as well as the audio world. How so? Automation can be used to apply fades, panning, etc. These days we hear automation in most of the music that we listen to. In almost all cases you will hear some sort of automation in today's modern music. Let's listen to a few songs that use automation.
Today we'll look at how we can apply automation in Reason to create a Fade Out for our arranged music.
1. Open Reason.
2. Open your completed arranged beat. If you have NOT arranged a beat yet, make sure you complete the previous class assignments to do this lesson.
3. With your arranged beat, turn the "Loop On/Off" to "Off".
4. Now let's take a look at the mixer on our screen. Notice that it has a Master Fader on the bottom right? This Master Fader controls the volume of the entire song as a whole. That means that if the whole song distorted, the MF can be used to turn everything down, though this isn't exactly the best method and many would consider it better to turn down the individual instruments that are too loud.
5. Hold the Control key on the keyboard and click the mixer. You should see an option to Create a Track for Mixer 1. Alternatively, if you click the mixer then go to EDIT you should see Create a Track for Mixer1. You should notice a new track on the sequencer of Reason that says Mixer 1.
6. Go to the last chorus of your song, before the outro. Click on the mixer track and press record. You may/may not see a box appear just yet. Once you reach the Outro of your beat, click on the Master Fader and slowly drag the mouse down so that the volume gets quieter. A box should appear on the sequencer with a declining line. This line is a visual representation of the automation that you just created. You should also see a Green Box on the MF of the mixer.
The Mixer Track
Automation Box with Declining Line Means Fade Out
A Green Line Box Means that there is Automation on an instrument
7. You can control whether or not you want this automation by clicking the Master Level button on the Mixer 1 track. If you don't like your fade and want to try again, simply delete your box on the sequencer and try to record a new fade out.
Full Song Check list:
At least 5 instruments: Bass, drums, synth, etc.
Song Structure: Intro, Verses, Chorus', Outro to make up 89-97 bars in length
Mixing: Volume, Panning, Effects
Automation Outro
Refer to previous blogs for explanation on each subject.
Thanks!
Today we are going to continue working on your first full song but we will add an extremely important element called MIXING. Mixing is when we take all of our tracks and arrange them in the two channel, left and right Stereo mix.
In the early days of recording, they recorded in mono(one speaker), they also had only 4 microphone tracks or less, so mixing did not really exist then. As technology advanced so has the idea of mixing. In the 1960's we began to hear music in stereo and more and more tracks were added to the songs. Now we are able to record as many tracks as we want, and for movies they are even able to mix in surround sound.
For music though, we usually just mix in stereo, with a left and right side.
According to "The Mixing Engineer's Handbook," for every type of music there are six important elements to a MIX.
1. Balance- the volume level relationship between the musical instruments
2. Frequency Range- having all frequencies properly represented
3. Panorama-(pan-L and R) Placing your instruments in the "sound field"
4. Dimension- Adding ambiance to your instruments(FX)
5. Dynamics- Controlling the volume of each track
6. Interest- making the mix special
Please listen to the following examples in your head phones.
Here is an example of music from the 1950's that is recorded in Mono:
Now compare to a song from today that has a complex mix, arrangement and FXs:
What did you notice about the mix of Beyonce's song Radio?
When using Reason where do you think we could start to begin mixing your song???
The Mixer!
The first things we are going to learn about the mixer is how to control the volume of each instrument and how to place them in the "sound field"
For each instrument we create in reason there is a corresponding track in the mixer. The 14:2 Mixer has 14 tracks and we can mix them in stereo(2). We are going to focus on the bottom of the track that looks like this:
This shows that we are working with the Redrum. The white knob controls the volume for each instrument. When I talk about the Sound Field I am referring to where the instrument is in the left and right stereo speakers. This is known as Panning. There is a knob on each track with an L and R. By turning this knob you can control what side of the head phones you will hear that instrument.
Adding FX: There two effects that I am going to show you today, the first is called REVERB, short for reverberation. This is an echoing sound that persist after the original sound is played. In reason there a few different reverb effects processor. I am going to have you start with one called the RV-7 Digital Reverb.
To put reverb on your instruments you must first click on the instrument that you want to work with. Once it is highlighted, go to the tool window and under the devices window you should see several effects. Double click on the effect called RV-7 Digital Reverb.
Ok, so what do we see...
First there is a switch to have the reverb on, off or bypass. This is a great way to compare and contrast what the instrument sounds like with the reverb on and with it off/bypassed.
-Where it says "hall" is where you can select different reverb settings that are different sized rooms.
-Size refers to the size of the imaginary room that your sound is echoing in
-Decay is how long a sound takes to fade out
-Damp is a filter that effects the tone of the instrument
-Wet/Dry is where you can control how much of this reverb you want on your instrument.
Another effect that you can use today is called DELAY. Delay is an echo effect that plays the initial sound back after a period of time. In reason the delay is matched with the tempo so it sounds on beat with your song. To start using delay you can use the DDL-1 Digital Delay line.
When dealing with the volume, panning and effects of each instrument you need to think about the elements of your arrangement. This will help you decide where to place your instrument in the mix to create the right balance.
Arrangement Elements: Foundation: The rhythm section, usually Bass and Drums Pad: Long sustaining note or chord often synthesizer, organ, strings or guitar power chords. Rhythm: Any instrument that plays counter to the foundation element. It can be double-time shaker, tambourine, rhythm guitar strumming on back beat. This adds motion to the song Lead: a lead vocal, lead instrument or solo Fills: Fills generally occur in the spaces between lead lines or they can be a signature line.
We are now at a point where we are ready to start arranging beats. This is important for numerous reasons. The beats we have been making lately have just been loops, meaning all we hear is the same thing repeat over and over again. We haven't been able to decide when we want to hear a certain sound. Maybe you want to drop a certain melody out for a verse in the song, or you only want one instrument to play during the intro. All of these can be achieved by arranging a beat. Another word for the "arrangement" is the "sequence", as it is the order that events happen in the beat.
There are many different styles of Intros. Here are a few different styles that I came up with that you can think about when creating your intro.
1. "The Build Up" A common why to start a song is to introduce one intrument at a time and build up the intensity of the song. Example of building up intensity one instrument at time:
2. "The Drum drop" OR Starting with only the Drums This is when the song begins with other instruments(piano, guitar, etc.) before the drums kick in. It is also very common to do the opposite -start with only the drums and then have all the other instruments drop in together. Ex 1- drums drop in
Ex 2- Drums start then instruments drop in
3. "Attention getter"This is an exciting way to demand your audience's attention. This can be done in a variety of ways, here is one way to do it:
4. "Sound Fx, Synthesizer and Pads"A great way to intrigue your audience is to start with unique and interesting sounds. Pads are a type of Synthesizer patch that can add a lot of character to your song. When you play a pad on your keyboard the sound transforms as you hold the note. This will add interesting texture and create a unique atmosphere in your song. On the Synthesizer instruments in Reason you can find a folder called Pads and one called FX. Please explore these sounds and feel free to add them to your song!
Open Reason.
Open your beat you made on Tuesday.
Make sure you have all your parts Copied To Track.
Highlight all your parts.
Go to the Edit Window, Select Copy.
Go to the Edit Window, Select Paste.
Move the Right Loop Point to 33.
Paste your parts until you get to the Right Loop Point.
Save your beat.
Now focus on the INTRO, 1-9. Your intro is the first impression people get when they hear your song. It's like when you meet someone for the very first time, you can't tell the person your life story in a sentence, but you can give them an idea about you and your personality in the way that you greet them.
The best intros make the listener want to hear more, the worst make the listener skip to the next song. The intro usually drops one of the parts from the beat. If you drop the drums or the bass line, it can cause some tension, and bring the listener in.
Focus on the Intro from 1-9.
Delete a part such as the drums or bass line to "Introduce" your beat.
Save your beat.
Now we can work on the Verse.
Remember, from yesterday, the verse is the part of the song that tells the story and is different every time.
We want to create space for a vocalist in our verse.
From 17-33, delete the melody from your song.
Now, we have 3 sections. The Intro from 1-9, the Chorus from 9-17, and the Verse from 17-33.
Highlight all the parts between 9-33.
In the Edit window, select Copy.
In the Edit window, select Paste two times.
Now Highlight all the parts between 9-17.
In the Edit window, select Copy.
Move your cursor to 81.
In the Edit window, select Paste.
From 81-89 Create an Outro by deleting all the parts except for your melody.
Save your beat! Save it as (Your name)_fullbeat
Congratulations, you've made your first full beat! Now let's take what you learned in this lesson to turn the rest of the beats that you made on Tuesday into full beats. You can also take this time to start on a new beat that you may even want to try to turn into a full beat today.


